Active Directory Certificate Services
Introduction to Certificates
Certificate Authorities enable the Internet to securely provide access to services using encrypted protocols like Secure Socket Layer (SSL).
In the early days of the internet, files and communications were plain text (unencrypted). There were fewer malicious individuals then, and the Internet was a much smaller place. While not ideal, your PC broadcasting confidential information everywhere did not present the same concerns that it does today.
Securing Communications
One way to obfuscate the contents of your communication is to speak in a foreign language that anyone listening doesn’t know. Essentially, encryption does the same to data protected by SSL.


Functions of a Certificate
Example Certificate for github.com:

Regardless of if you view the certificate in your browser, terminal, or the certificate manager in your OS, you will see the same content:
Negotiation Data
- Identity of the intended recipient
- List of CA’s in the approval process
- Validity start and end dates
Supplemental Data
- Organization information
- Optional metadata
- How this certificate can be used
The list of CA’s in the approval process is called a certificate chain, chain of trust, or certificate hierarchy. It will provide a tree view of the Root CA and Intermediate CA(s) involved in signing this certificate.
All root and intermediate CAs in the chain must be trusted by a device for the certificate to be trusted.
Deploying Active Directory Certificate Services
There are many ways to set up different CA topologies, but using ADCS is one of the easiest and most common methods. If you leverage AD a lot in your environment, then using ADCS for your CA’s could make sense.
ADCS is fairly simple to set up and administer, but as a result, it is not very feature-rich and tends to be very bare bones. Another thing to remember is that the more things you integrate with AD, the more vulnerabilities you are introducing into the core of your environment.
Initial Setup
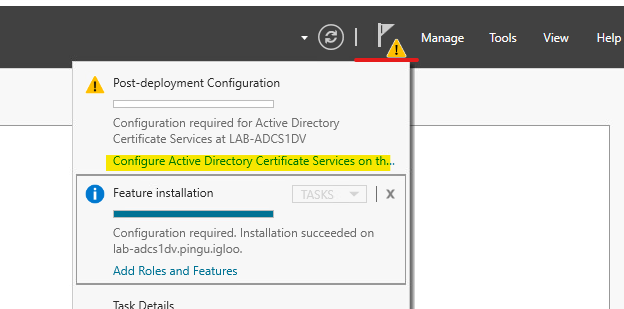
After you complete the installation, click the ADCS notification in the server manager.

Callouts for the configuration wizard:
- If you installed other services during the install (web enrollment) do not check the boxes yet.
- Choose the options to set it up as an ‘Enterprise CA’ and a ‘root CA’
- Create a new private key and leave the default at RSA 2048
Using the Certificate Server
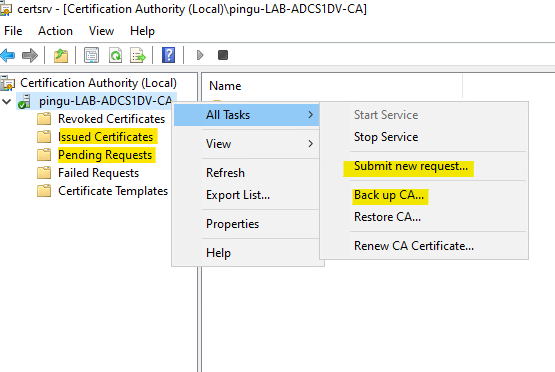
Open the Certificate Services application to interact with the CA.
- The most common thing you will do is ‘submit a new request’; this is where you upload a CSR/REQ/DER file, and the CA will provide you a signed certificate.
- If you ‘Backup CA …’ it will export a list of all certs in the CA as well as the records for the CA itself.
Other common operations:
- To see signing requests from AD & IIS you can click ‘Pending Requests’.
- The CA keeps a record of anything it has signed in the ‘Issued Certificates’

Integrating Certificate Authorities
Certificate Server
- Login to the root CA you configured earlier
- Open the Certificate Services MMC
- Right click on the root CA in the navigation pane
- Hover over ‘All Tasks’ and click ‘Backup CA’ and click ‘Next’
- Check the box for ‘Private key and CA certificate’
- Click the ‘Browse’ button and navigate to the Downloads directory
- In the filepath to the left of browse, add a ‘\tmp\’ after the ‘\Downloads’
- Click ‘OK’ on the dialogue box asking if you want to make the \tmp\ directory
- Use a good password on the following prompt to encrypt the file
- Click ‘Finish’ to complete the export to a .PFX file
If you installed an intermediate CA, you will need to repeat steps 1-9 for each CA in the chain.
Domain Controller
- Login to one of your domain controllers
- Copy the .PFX file from the previous step to the DC
- Open the Group Policy MMC
- Create a new GPO or edit an existing one as makes sense
- Navigate to
Computer Configuration -> Policies -> Windows Settings -> Security Settings -> Public Key Policies - Right click on the ‘Trusted Root Certification Authorities’ container/folder and click Import
- Click ‘Browse’ and select the .PFX file from the previous step and click ‘Next’
- Put in the password you used to encrypt the file
Do not check the box to make the key exportable
Check the box to Include all extended properties - Click ‘Next’ and ‘Finish’
If you installed an intermediate CA, right click on the ‘Intermediate Certification Authorities’ container/folder and click Import. You must repeat steps 1 – 8 for each CA in the chain.
Article Summary
Article Appendix
I am trying out the concept of an appendix and hitting some tangential things that don’t fit in the article. Let me know your thoughts on this.
Definitions
Terms
- Certificate – File that encrypts communication or data (aka public key certificate)
- Encryption – Process that results in altered data that can only be restored by knowing the algorithm and password used to change it
Certificate Files
- PKCS7 – Public Key Certificate System #7, an all-encompassing certificate that contains a public key and a private key
- PFX – Personal Information Exchange, synonomous with PKCS7
- CER – Certificate file (synonomous with DER or PEM files), binary format with no private key
- CSR – Certificate Signing Request, file that contains a hosts public key and is submitted to a CA for signing
- REQ – Certificate Request, file that contains a hosts public key and is submitted to a CA for signing
Protocols
- SSL – Secure Socket Layer, a protocol that encrypts data
- TLS – Transport Layer Security, successor to SSL and is a protocol that encrypts data
– TLS is often referred to as SSL even though they are different protocols - HTTP, FTP, Telnet, SMB1, SNMP1 – unencrypted communication protocols referenced in this article
- HTTPS, FTPS/VSFTP/SCP, SSH, SMB3, SNMP3 – encrypted communication protocols referenced in this article
Certificate Authorities
- CA – Certificate Authority, entity that signs certificates
- Root CA – Root Certificate Authority, the highest level of CA and the CA that authorizes other CAs to sign certificates
- Intermediate CA – aka subordinate CA. Intermediate Certificate Authority, a CA approved by the root CA to sign certificates on behalf of the root CA
Unused terms (explained more in a future article)
- RSA – Mathematical algorithm that encrypts/decrypts data using a public/private key pair
- Wildcard – Way to include every variation of a domain with a single definition (ex. *.google.com)
- PKI – Public Key Infrastructure, the system or framework you use to store/manage/approve/revoke/issue certificates
- OCSP – Online Certificate Status Protocol, used in tandem with CRLs to determine the validity of an issued certificate
- SCEP – Simple Certificate Enrollment Protocol, way to request a certificate for non AD devices (ex. switches)
- Public Key – used to encrypt data, cannot decrypt any encrypted data
- Private Key – used to decrypt data, cannot encrypt any data
- CRL – Certificate Revocation List, list of revoked certificates that all CA’s in the PKI must be agree (sync) on
