Overview of Veeam

Veeam is the authority and leading solution for data backup, migration, replication, and recovery of VMWare (and generic storage) enviornments. While they are not officially a VMWare product, VMWare uses Veeam for their own data backups.  
 
This article aims to walk through the initial setup of common Veeam products.  

Veeam Backup & Replication

Introduction to Veeam Backup & Replication

Veeam Backup & Replication (Veeam BR) is the bread and butter of the Veeam ecosystem. All Data backups, migrations, recovery, and rapid replication will be managed from here.  To interact/manage the Veeam BR server you will use the Veeam Console, which is a desktop application that you point at whatever server you want to manage.
A Veeam backup job starts with the backup proxy, this is a machine (either the Veeam BR server or an external agent) that handles any data level operations taking place between the source data and the destination. Deduplication, compression, encryption, and rate limiting are all handled by the backup proxy.  
The storage targets of your Veeam jobs are called backup repositories, which can be stored locally, in object storage, in the cloud, or on fileshares (SMB/NFS/ISCSI). Repositories that store data in multiple locations are called scale-out repositories and are designed to move data over time from storage that is hot  > cool > cold. Veeam refers to the hot/cool/cold storage as: the performance tier, the capacity tier, and the archive tier.

Typically you have the fastest R/W devices closer to your data source and slower R/W devices are in remote locations as it is less likely to need to restore from them. For example:

Performance Tier – you keep a backup of your homework on a local NAS for 3 days. 


Capacity Tier – After 3 days it is unlikely that you will need to resubmit your homework so you move your backup to iCloud or OneDrive.


Archive Tier – After the semester ends you are confident that you will not need to find your homework quickly so you move it to an archive in Azure for cheaper long term storage. 

If you have BR applications for your cloud enviornments (ex. Veeam Backup & Replication for Azure) you can add those repositories as external repositories. It is worth noting that external repositories are read only and cannot be used as a traditional backup target for your local jobs, the usecase for adding them here would be to push backed up systems from one cloud into another.  

The license that you have obviously shapes what functionality you have access to. This article was made with a Veeam data platform license (12.1.1) but 90% of the steps can be done with a Community Edition license (tested 11.0.1 and 12.1.0).  

Veeam BR - Installation

To install Veeam Backup & Replication you just need to mount an installation image and follow the wizard which is fairly intuitive.  

Note that if the server hosting Veeam BR is joined to an Active Directory domain, Veeam BR will integrate with AD. This means you can set permissions to access Veeam, and more importantly: provide Veeam a service account instead of running a service under someones account.
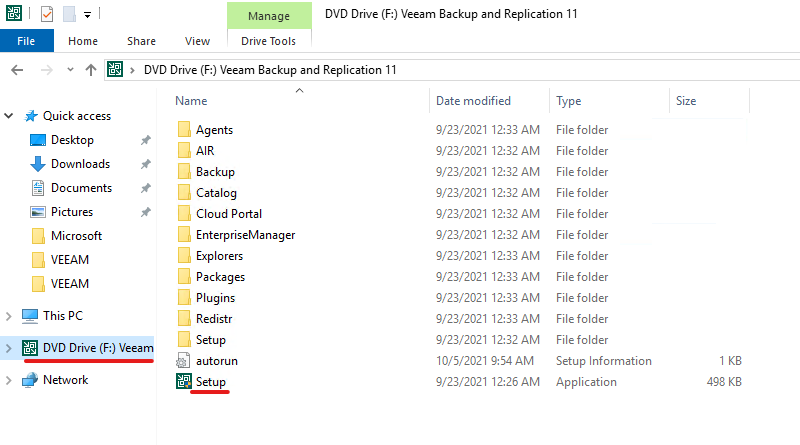
1. Download the latest Veeam ISO
2. Mount the ISO (double click it)
    – If the installer does not autorun, open the image and run setup.exe
4. When the install wizard opens, choose ‘Install Veeam Backup & Replication’
5. Accept the EULA
6. Point the installer to your license file
7. Set your install location
8. Provide a service account in AD or a local windows one
    – Don’t be lazy and use the SYSTEM account
9. If you have a SQL instance you can point Veeam at it or install a local database via the wizard
    – If you have a previous Veeam DB, delete or rename it and restore a config backup 
10. Confirm what ports the VEEAM application should use
11. Set the location of the cache and catalogue before installing

Veeam BR - Setup

1. Click on the hamburger drop down menu upper left
2. Hover over the Credentials sub menu
     1. Open the ‘Datacenter Credentials’ object
     2. Change the password on all existing accounts (avoid using default creds)
     3. Build out any service accounts, AD logins, and SSH credentials here
3. Go back into the Credentials sub menu and add Cloud access and Encryption keys
4. Click on the hamburger drop down again
5. Open the ‘Users & Roles’ sub menu
6. Add appropriate users and groups from Active Directory or on the local machine
7. Setup MFA is needed (disabled by default)
8. Setup situation specific configs as needed
   1. Open the ‘Malware Detection’ sub menu and enable inline entropy analysis
   2. Using the ‘Options’ sub menu set SMTP and SSL certificates

Veeam BR - Backup Repositories

Remember that backup repositories are the locations that Veeam BR can send data to. Typically you set something up on-premises and something else in the cloud.

Lets start by adding a local fileshare as a backup repository. 
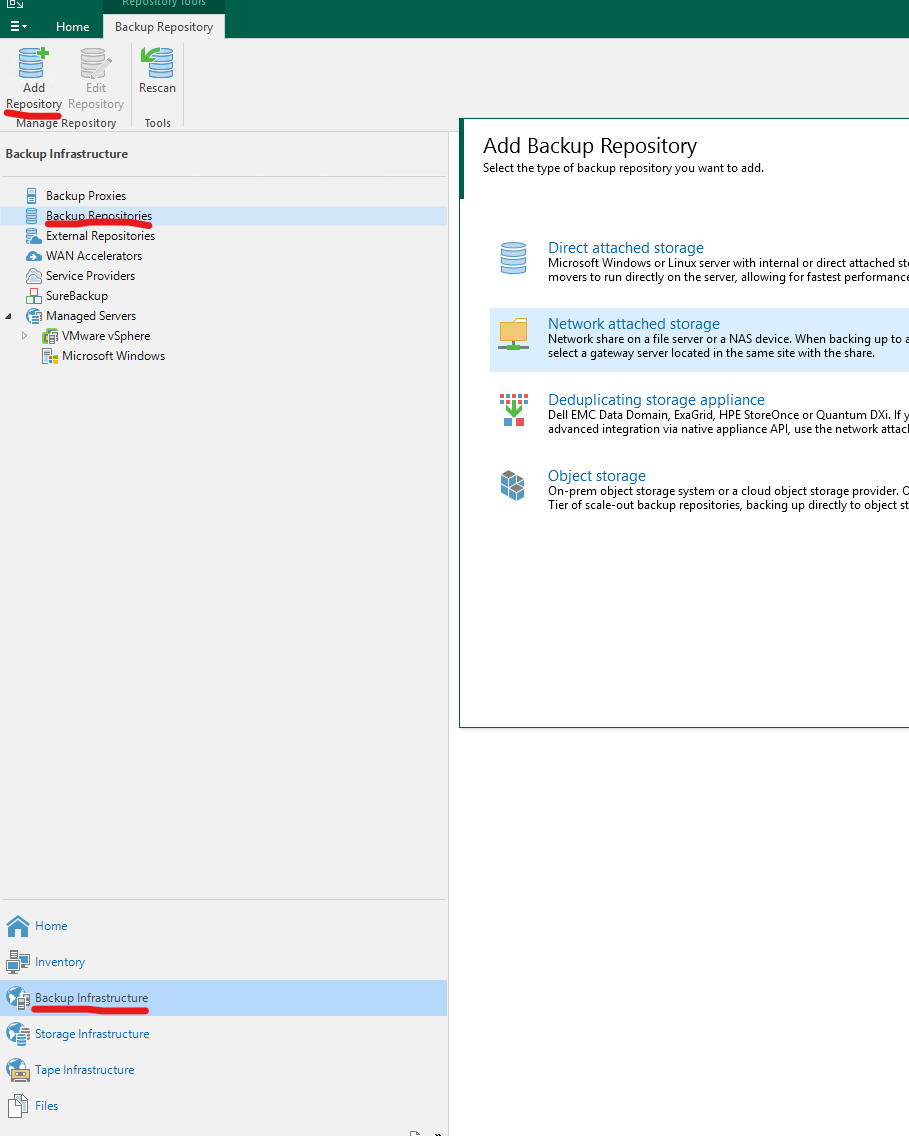
1. Open the ‘Backup Infrastructure’ menu by clicking the menu item in the lower left
2. Select the ‘Backup Repositories’ item in the upper left and then click ‘Add Repository’ 
3. Choose the option for NAS/SMB/NFS
4. The Backup Repository setup wizard will guide you through setup
   1. Set the method to SMB
   2. Provide the name & description
   3. Define the share path and credentials
   4. Use the default repository settings
   5. Local server as the mount host and a directory on the data drive for cache
       – Make sure vPowerNFS is enabled
   6. Review and apply the configuration
5. If prompted to change the default configuration backup location choose no
Now we will build a backup repository in Azure to create off-site redundancy.
1. Open the ‘Backup Infrastructure’ menu by clicking the menu item in the lower left
2. Select the ‘Backup Repositories’ item in the upper left and then click ‘Add Repository’
3. Select ‘Object Storage’ and select Azure
4. Use the Azure Blob storage option
5. Provide the name and description for this repository
6. Click the ‘Add’ button and provide your access key and storage account name
7. Select the storage container you want to target
   1. Click ‘Browse’ and select the appropriate folder or make a new one with the wizard
   2. Check ‘Use cool storage tier’ only if this is for infrequent full backups (no deltas)
8. Confirm the mount server and cache are correct and that vPowerNFS is enabled
    Depending on your license you will see  ‘VEEAM helper appliance has not been configured’
     1. Click the Configure button
     2. To the right of the subscription dropdown click ‘Add’
     3. Provide a name and description
     4. Leave the default ‘Microsoft Azure’ radio button selected
     5. Proceed with the ‘Create a new account’ radio button selected
     6. Use the code provided to sign into microsoft.com/devicelogin
     7. Confirm the changes you made
     8. After the account is made go back to the wizard in step 8.2
     9. Select your subscription in the dropdown and set the config or leave as default
9. Review and apply the configuration
Finally lets build an archive repository in Azure for cheaper long term storage.
1. Open the ‘Backup Infrastructure’ menu by clicking the menu item in the lower left
2. Select the ‘Backup Repositories’ item in the upper left and then click ‘Add Repository’
3. Select ‘Object Storage’ and select Azure
4. Use the Archive storage option
5. Provide the name and description for this repository
6. Use the dropdown and slect the storage credentials
7. Select the storage container you want to target
    Click ‘Browse’ and select the appropriate folder or make a new one with the wizard
    Make the backups immutable if appropriate
8. Leave the ‘Archive’ radio button selected
9. Select your subscription in the dropdown
Now we can build our Scale-Out repository for tiered backups.
1. Open the ‘Backup Infrastructure’ menu by clicking the menu item in the lower left
2. Select ‘Scale-Out Repositories’ in the middle left then click ‘Add Scale-Out Repository’
3. Provide the name and description
4. Use the ‘Add’ button on the right to target your local (NAS) repository
5. Leave the default ‘Data Locality’ radio button selected
6. Enable the use of capacity tier and use the ‘choose’ button to select the Azure Blob
    Change the time and situation for data to move from performance to capacity if needed
    Encrypt the backup if appropriate
7. Enable GFS backups to object storage and use the dropdown to select the archive repository

Veeam BR - Inventory

Lets tell Veeam about a vCenter/ESXI Cluster so we can protect our data.
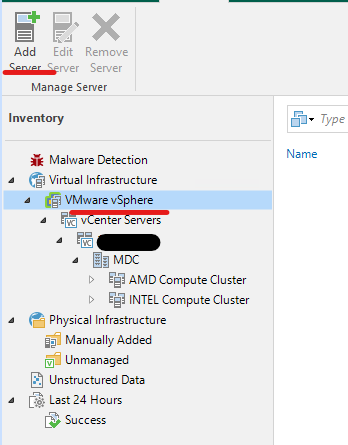
1. Open the ‘Inventory’ menu by clicking the menu item in the lower left
2. Click on ‘vSphere’ servers in the middle left and then click ‘Add Server’ in the top left
3. Provide the DNS or ip of the vCenter appliance and a description
4. Use the dropdown to select appropriate credentials
5. Review an apply the configuration

Veeam BR - Jobs

Now lets back up some of the virtual machines in our vCenter.
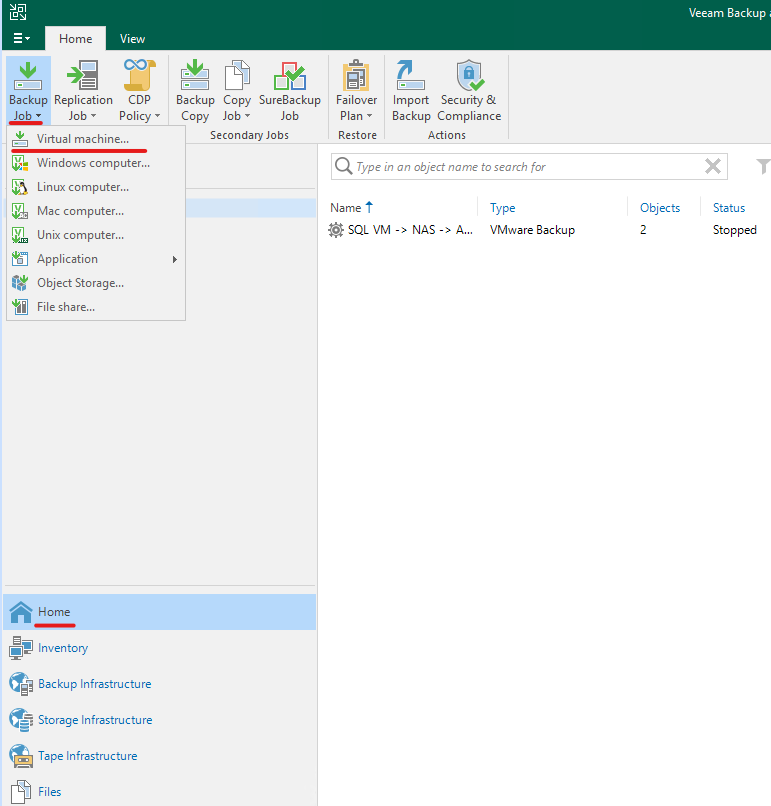
1. Open the ‘Home’ menu by clicking the menu item in the lower left
2. Select the ‘Jobs’ dropdown in the upper left and click ‘Virtual Machine’
3. Provide the name and description
4. Use the ‘Add’ button on the right to define the VMs to backup
5. Use the ‘Backup Repository’ dropdown to select your scale-out repository
   1. Enable GFS by checking the box for ‘keep certain backups longer’
   2. Click the configure button to the right of the GFS checkbox
   3. Set your desired full backup date and scope
   4. Click the ‘Advanced’ button in the lower right to configure deduplication and compression
6. If needed you can enable application aware backups, filesystem indexing, and malware analysis
    If you can justify it I would recommend using these as its invaluable for rapid recovery
    Make sure to provide the system admin credentials using the dropdown at the bottom
7. Schedule the job and set priority before applying the configuration

Veeam BR - Updates

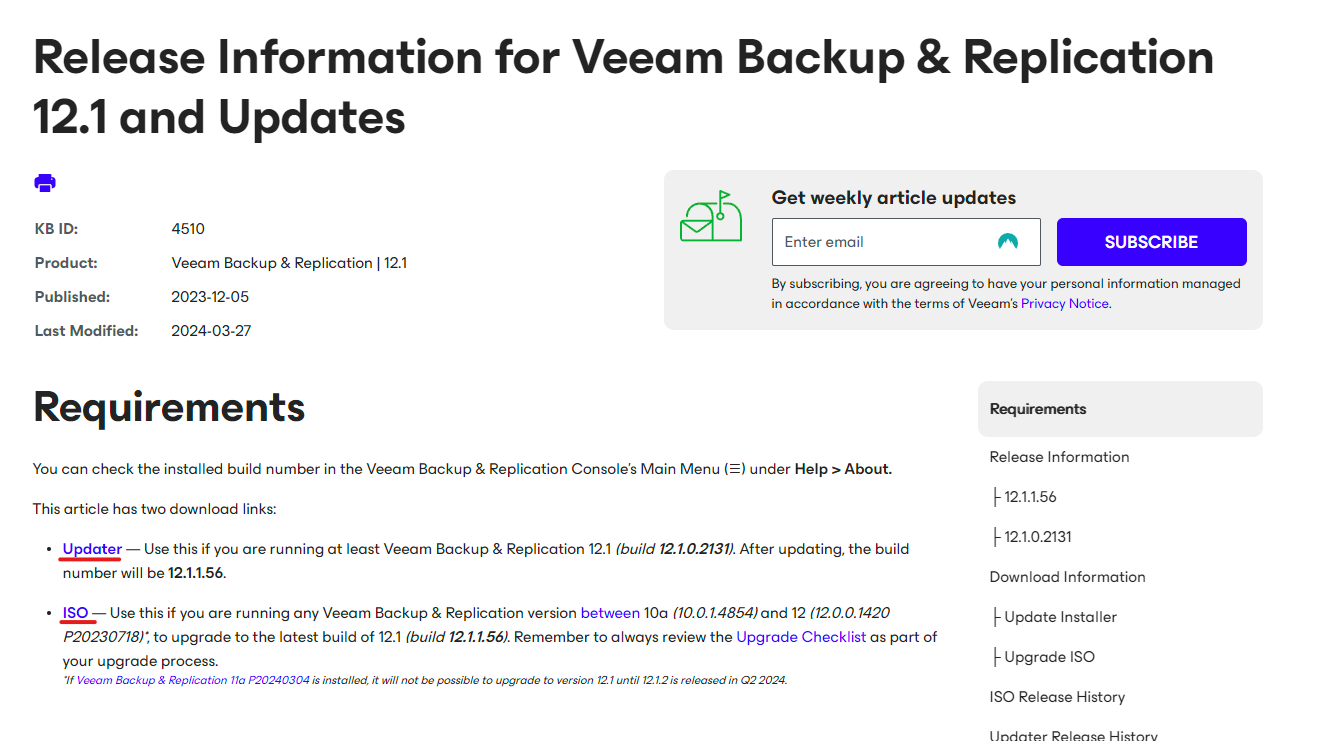
1. Find latest KB link on their releases page 
   – For this example I am using 12.1
2. If you are currently using the same major release (update), click the updater link
3. If you are not currently using the same major release (upgrade), click the ISO link
4. When download is complete run the installer

Veeam One

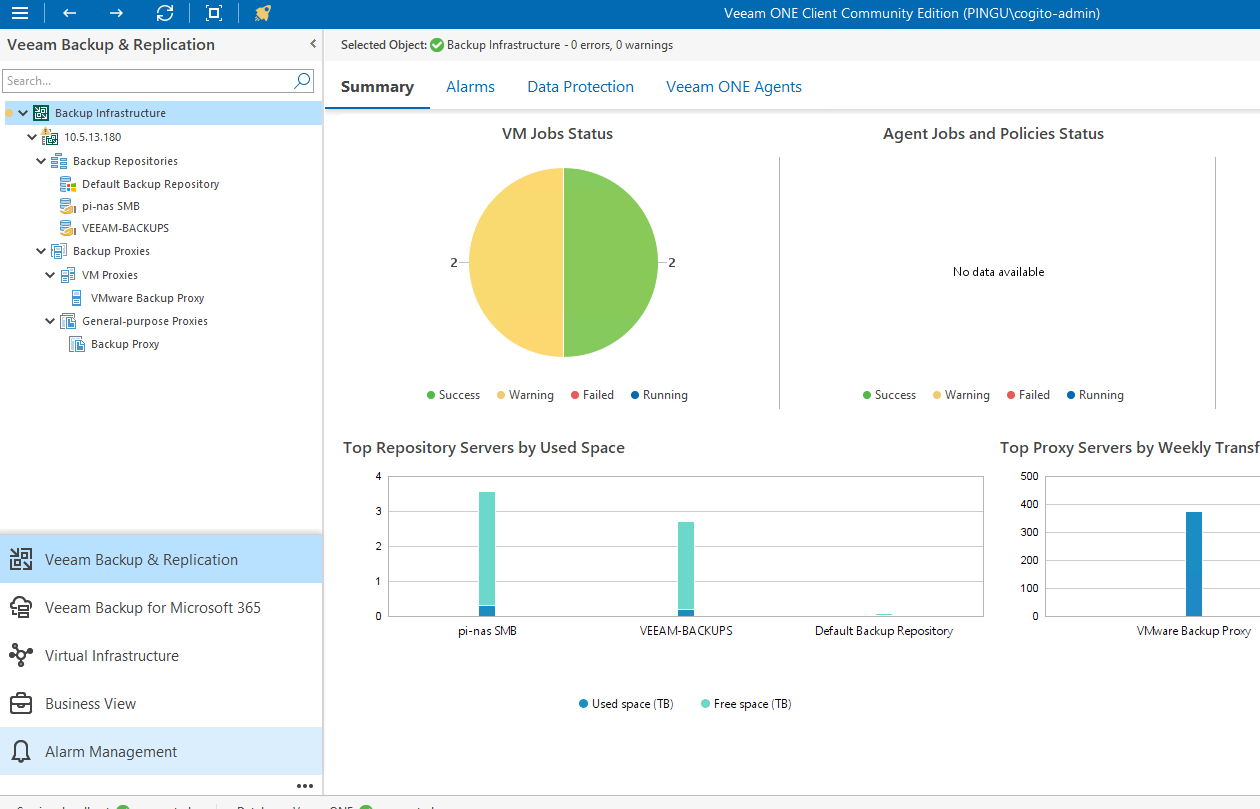
Veeam ONE is a tool for monitoring and responding to your Veeam Infrastructure. The Veeam ONE Client software is a graphical interface for pulling reports and monitoring any conditions and metrics about your backup, replication, and recovery jobs. Veeam ONE Server software is purpose built to manage your Veeam backup Infrastructure and enforce any actions initiated from the Veeam ONE Client. Recently Veeam ONE has been expanded to support scripted actions in response to events (for instance automated replication or isolating corrupted/infected data).  

If you install the Veeam ONE server on the same server as your other Veeam products (Backup and Replication or O365) it should automagically detect everything already in place. If you install it elsewhere you can point it at wherever you need by right clicking anywhere in the left hand navigation pane and clicking ‘Add Server’.

Veeam One - Install

1. Download Veeam ONE from the web portal
2. Double click the .ISO file when it finishes downloading
3. If the installer does not autorun you may need to open the image and run setup.exe
4. When the wizard opens choose to ‘Install VEEAAM ONE’
5. Accept the EULA
6. Set your install location and click install

Veeam One - Setup

On connecting to the Veeam ONE server with the Veeam ONE Client you have the option to configure SMTP and email alerts on a splash screen. Other than Email configuration Veeam ONE is ready to use out of the box. Its main purpose is monitoring and reporting but it can be used in tandem with Veeam Orchestrator to automate responses to events and provide best practice analysis and feedback.  

Veeam Data Platform

If this is not for production use, it does not make sense to limp by with the Veeam Community Edition if you qualify for the NFR Data Platform. If you meet the qualifications you can get a one year license for this enterprise edition that includes Veeam: Orchestrator, BR, and ONE. To install it, make sure that you have uninstalled any other Veeam products as it requires a fresh install.

Veeam Data Platform - Setup

1. Open the VEEAM Orchestrator application (install directory)
    – Or navigate to localhost:9898 in a browser
2. On the webpage sign in with the account used to install the application (windows login)
3. Initiate the first time setup when prompted
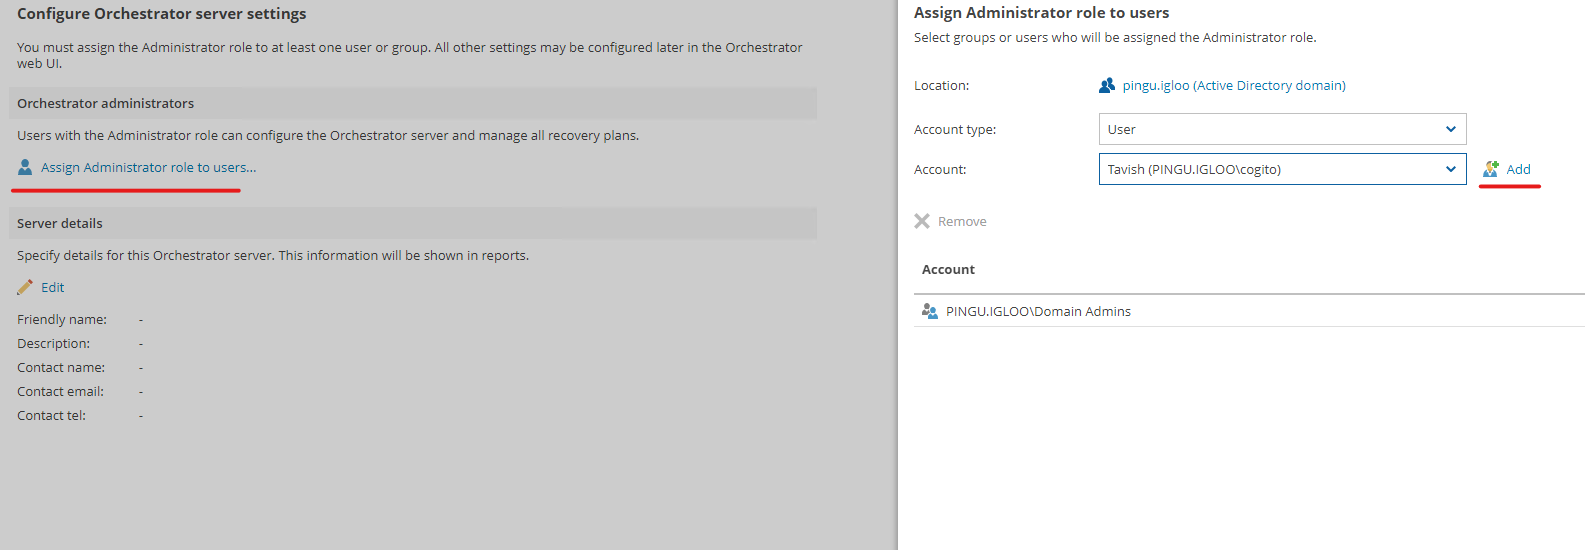
4. Create Administrators from users and groups in Active Directory or on the local machine
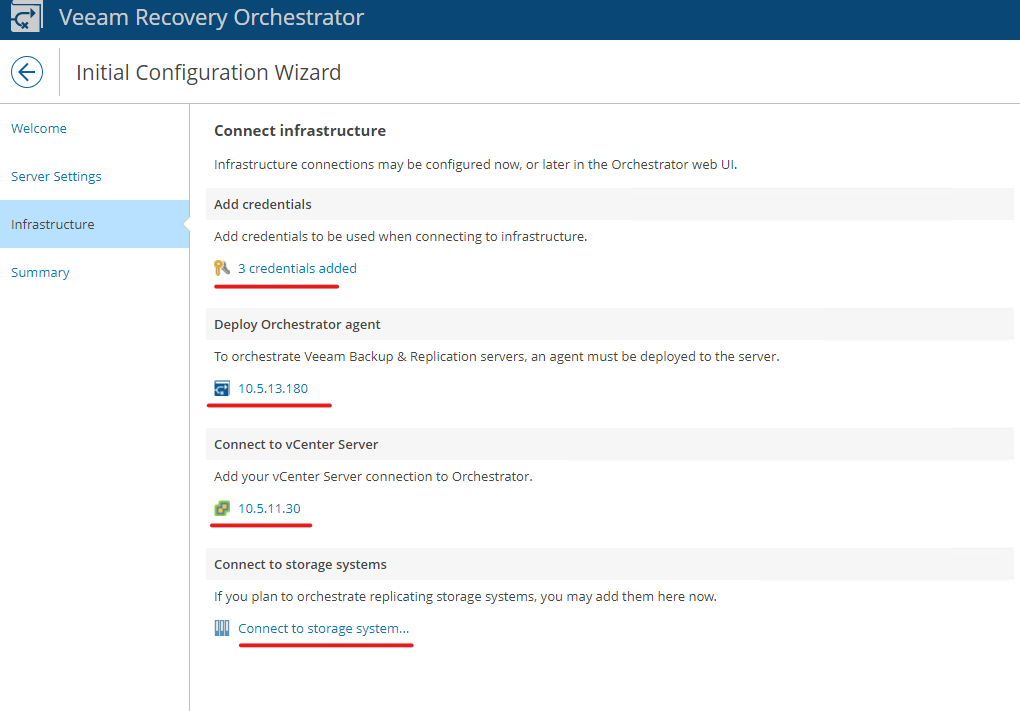
5. Add appropriate credentials and Infrastructure
6. Conclude the setup by accepting the configuration confirmation

Veeam Backup for O365

Veeam Backup for Office 365 is a tool for creating backups of enterprise O365 data. The most common usecases are to create user level backups of OneDrive and Exchange (Online or On-Prem) content but it is also possible to backup Sharepoint sites (Online or On-Prem) and Teams.  

Veeam Backup for O365 - Install

2. Double click the .ISO file when it finishes downloading
3. If the installer does not autorun you may need to open the image and run setup.exe
4. When the wizard opens choose to ‘Install VEEAM Backup for Microsoft365’
5. Accept the EULA
6. Set your install location and click install

Veeam Backup for O365 - Setup

To get setup with O365 we need to link the application to our O365 organization.

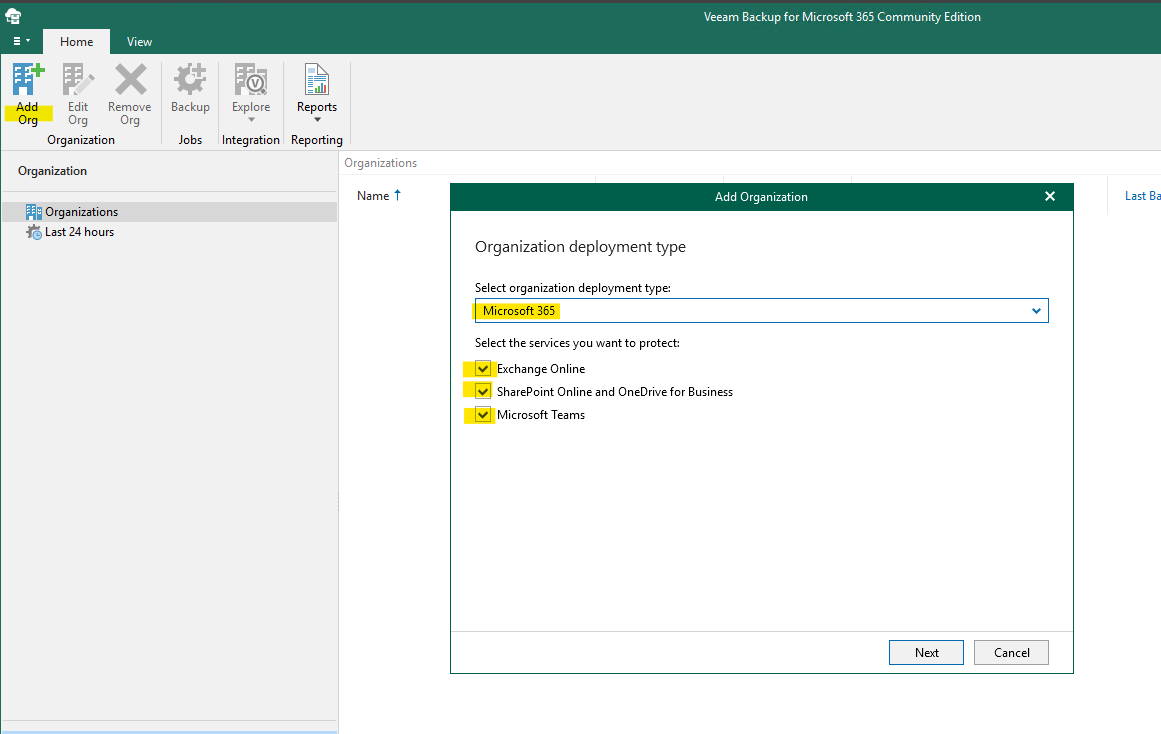
1. Click Add Org in upper left
    Leave defaults:
        Deployment type: Microsoft 365
        Check boxes:
            Exchange online
            Sharepoint Online and OneDrive for Business
            Microsoft Teams
2. On the following screen leave the Region as Default
3. Select radio button for modern authentication  
    If you check the box for legacy auth. Veeam will not auto create objects in the next step
4. Select the radio button that creates a new Azure AD application
5. Click the ‘Install’ button and generate a new self signed certificate
6. The next screen displays a code that you will need to enter on microsoft.com/devicelogin
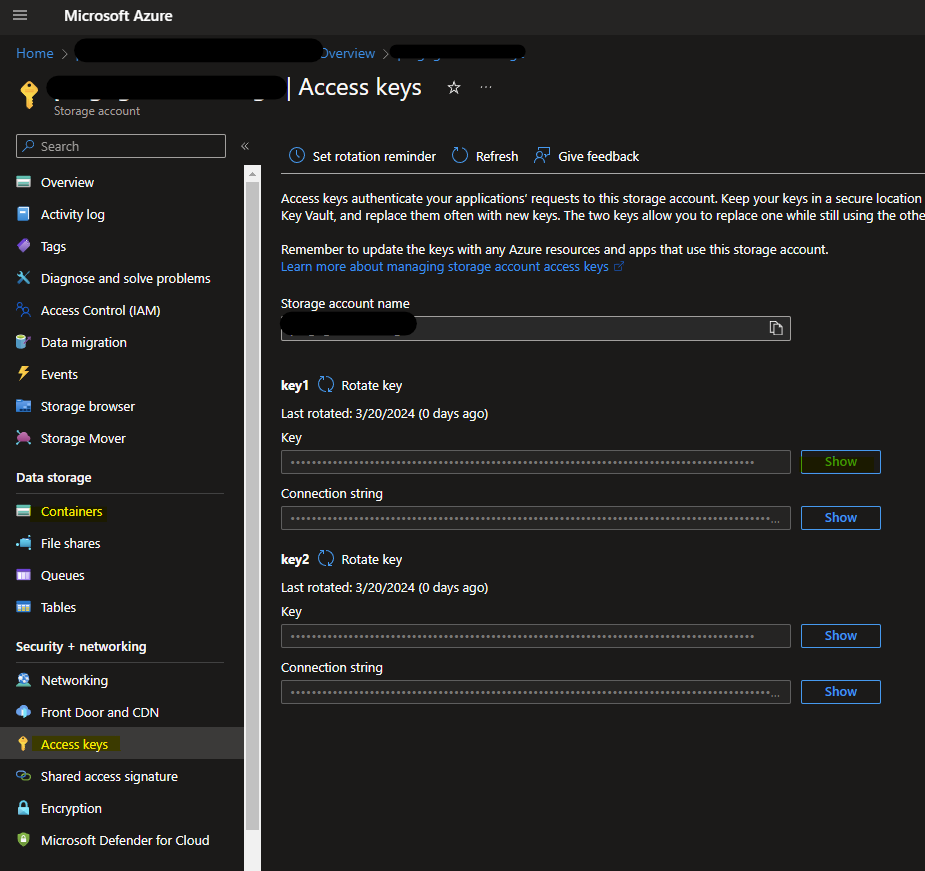
You can save your data locally or in the cloud, ideally you would do both. To use Azure you will need to use an Azure storage account. Use an existing storage account or create a new one and navigate to the blob containers and use an existing one or create a new container. Grab one of the two access keys from the storage account for Veeam to use to access the blob container.
To add a storage account:
1. In the Veeam O365 console click backup infrastructure in the lower left
2. Right click object storage and add backup infrastructure
3. Name as appropriate and click Next
4. Select Microsoft Azure blob storage
5. Provide the storage account name and the access key you got in a previous step

Veeam Backup for O365 - Job

1. Navigate back to organizations menu
2. Right click org and add to backup job
3. You can backup EVERYTHING in the organization or specify users/sites/groups/etc.
4. Use the Azure repository you built earlier as the destination
5. Depending on the sensitivity of data you can get pretty granular with the task scheduling

Veeam NFR O365

The Veeam O365 backup application also has an NFR version if you qualify. Similar to the NFR Data Platform, you get a one year license but will need a fresh install.

Veeam Troubleshooting

Requested URI does not represent any resource on the server = probably because you enabled hierarchacal namespaces on the storage account
 
Available azure subscriptions not found = youre probably not using a service account or the service account doesnt have approrpiate MS GRAPH access
 
This operation is not permitted = you cannot write to cold or archive blobs (presumably because of syncing deltas), use cool storage tier  
 
Failed to get Azure Immuteability config, snapshots persists = soft delete and versioning MUST be disabled on the storage account
  You MIGHT be able to fix using lifecycle mgmt to delete snapshots or storage explorer but likely that blob is permenantly incompatible