Virtual Network Environments
This article walks through the installation of some of the more popular ways to virtualize networks. There are a ton of other tools/solutions that are worth talking about later.
In networking, it is essential to lab your technology in a rapid, accurate, and scalable way. This is where network emulators come in as you can build as many hardware abstractions as you need. Network Simulators/Emulators are a front-end with focused networking features that interact with some kind of hypervisor or a trained simulation model/engine.
The terms Simulation, Emulation, and Virtualization are used interchangeably by the community but are different concepts.
- Emulation is about representing hardware within software. An example of network emulation would be if we pulled the operating system off a physical Cisco router and loaded it into a network emulator. You can use the emulated Cisco router, which is identical to the physical variation, including the hardware resource requirements and utilization.
- Simulation abstracts a system’s behavior and uses statistics and definitions to predict how real hardware would react. An example of network simulation would be if we mad a Cisco application out of if/then statements to mirror what an actual switch would do (if the user types ‘ping 1.1.1.1’ then display ‘Reply from 1.1.1.1 bytes …’ on the terminal)
- Virtualization is more conceptual than emulation or simulation and is about managing physical hardware resources. An example of network virtualization would be an emulated Cisco router using the physical server’s NIC as the WAN port. Virtualization maps physical resources to virtual ones but does not mirror the virtual resources 1:1 like emulation. It operates at the kernel level (ideally), making it much more exact than simulation.
Emulation
- Playing games on Dolphin
- Using apps on DosBox
- Running x64 on x86
Simulation
- Microsoft Flight Simulator
- Physics engines
- Threat modeling
Virtualization
- Hypervisors/VMs
- Docker containers
- Azure Virtual Desktop
Option 1: GNS3
Graphical Network Simulator 3 (GNS3) was the first network emulator I used to lab and study. It’s more complex to set up and manage than other emulators, but its open-source nature and the massive, active community that supports its development make it a rewarding choice. Standard deployments use a client/server model, and all management post-install is done from the client.
GNS3 - Install
GNS3 uses the KVM underlay for virtualization. Installing on Ubuntu is extremely easy, and the installation can add the server and the client to the same machine. Easy isn’t fun, so I am using Windows for this tutorial, but the steps are similar to those for Linux.
1. Download GNS3 for Windows
– You don’t have to agree to ALL of the SolarWinds bloatware
2. Run the installer, accept the default options
3. You will be asked to choose a hypervisor for the GNS3 Server VM
– I used ESXI, but it supports most of the popular hypervisors
4. Deploy the VM to your preferred hypervisor
5. Console into the VM from your hypervisor
6. Open the ‘Security’ menu
7. Enable authentication
8. Provide a username/password
GNS3 - Setup
Now that the server installation is complete, the next step is configuring the client. The first prompt you will encounter is crucial as it determines how you would like to deploy applications on the server. You can run it on Windows locally using Hyper-V, but for this demonstration, we will be following the traditional route.
1. Choose to ‘Run appliances on a remote server’
2. Provide server information
– IP address, Port 80, Username/Password
Although you can hand-build your own images to use within GNS3 using KVM, it is more common to use GNS3 community templates. Let’s grab something from the marketplace to demonstrate.
2. Open the Router device type on the far left navigation
3. Click “new template”
4. Choose to “import an appliance file”
5. Select the downloaded template from step 1
6. Confirm “Install the appliance on the main server”
7. Select your desired image version
– If your preferred image says ‘Missing” for your files, you can override
– Check the box for ‘Allow Custom Images’
– Click ‘Import’ and choose whatever files you have
– Alternatively, you can click ‘Create a New Version’
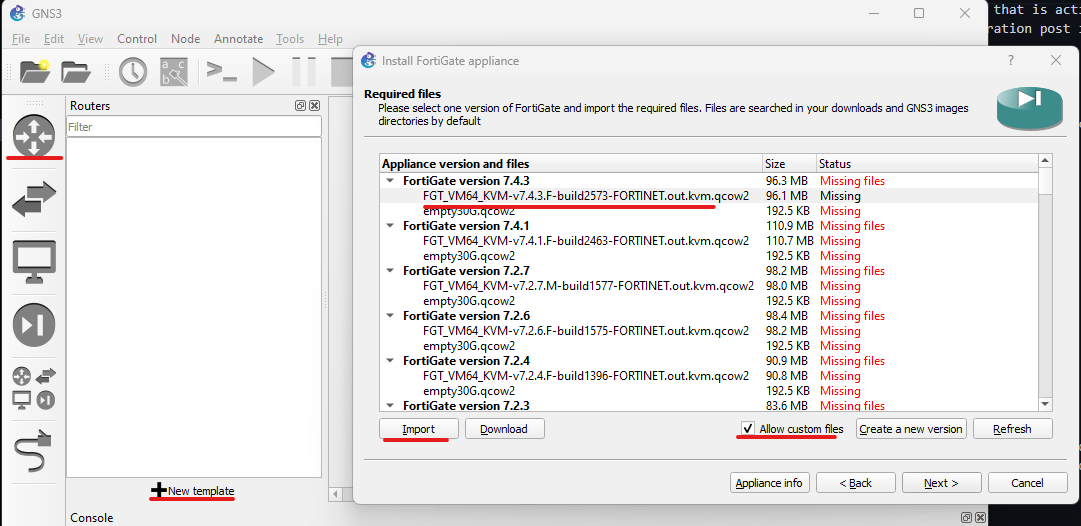
If you built your device with KVM and want to do this the hard way click ‘Edit’ in the top navigation header and click ‘Preferences’. From there, select the type of image (QEMU VMs, for example) and click the ‘+ New’ button. The wizard will guide you through allocating resources and uploading your disk image.
GNS3 - Thoughts
GNS3 is extremely stable and has significant community involvement, and support is available by posting on the GNS3 forum. Typically, I see people doing small Cisco labs in GNS3; for more complex and multi-vendor setups, GNS3 is not typically used. Now that SolarWinds has put marketing/branding everywhere and forces you to download their software, I recommend using something other than GNS3.
Option 2 - EVE-NG
Emulated Virtual Environment Next Generation (EVE-NG) is **THE** network virtualization platform used by the pros; I have never seen an expert do a networking demo with any other tool. It’s a fork of UNETLAB and offers an open-source option and a paid solution with more features. It is extremely vendor-agnostic, and thanks to its KVM underlay, EVE-NG is capable of virtualizing almost anything. In contrast to GNS3, EVE-NG is managed through a web UI without client software. For small-scale projects and simple designs, GNS3 and EVE-NG are comparable, and the best choice comes down to preference; however, in large-scale designs or complex networks, EVE-NG excels and should be used over GNS3.

EVE-NG - Install
The process for installing and configuring the free and paid solutions is nearly identical. I’m using the Community Edition (free) image for this demo, but it’s worth noting that you cannot go from the free image to the pro image; you have to reinstall from scratch if you want to upgrade.
– Grab the ‘client side’ downloads if you want desktop tools like VNC and Putty
2. Deploy the ISO to your hypervisor
– Depending on the hypervisor, may need to set to BIOS or EFI
– 200GB storage and 4CPU (virt and IO/MMU enabled) by 16GB RAM is pretty safe
3. Turn on the VM and console into it
4. Choose English and accept the config
5. Wait for EVE to reboot at least twice
6. Use the default login for initial setup
– root eve
7. Configure the hostname, IP, DNS, etc.
– if using ESXI, disable security settings on port group
8. Connect to port 80 on the management ip and login with default creds
– admin eve
9. Use the ‘Management’ dropdown in the top navigation bar and click ‘User Management’
10. Change the password for the admin user and create a new user for you to use
EVE-NG - Setup
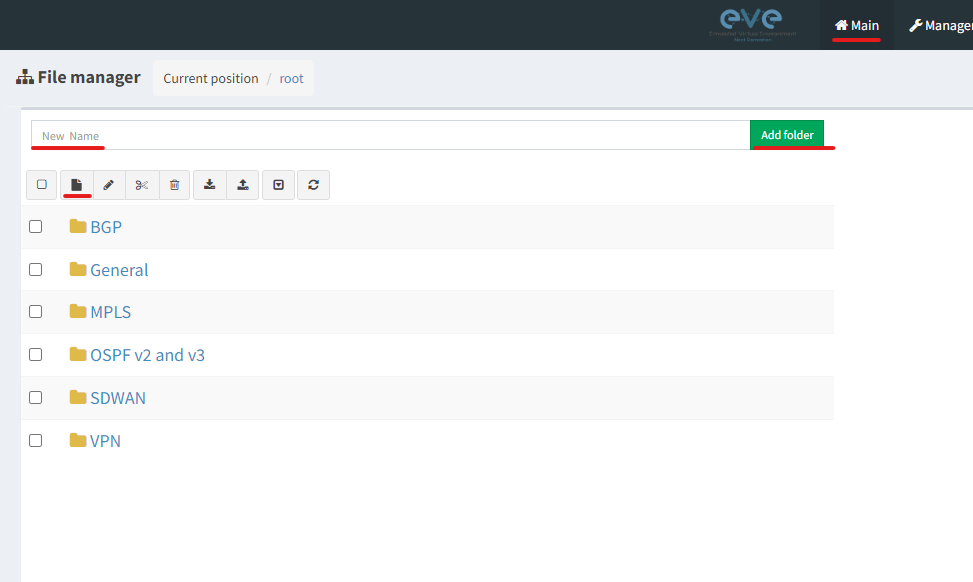
1. Click on ‘Main’ in the top navigation bar
2. Create a new lab using the icon that looks like a Word document
– You can also create folders by typing the name in the text field above the lab menu
– You can Import/Export labs from here as well
3. Provide the name, author, description, and any optional details for your lab
4. Right-click anywhere in the workspace and click ‘New Node’
5. Use the dropdown to select the device type that you want
6. Provide your configuration for the node(s)
– Use the image dropdown if you have multiple releases of the same device type
– Multiple units with the same name will have -x appended to whatever is used in name/prefix
– Not every device uses Telnet so use the Console dropdown and change to VNC if needed
7. Save the configuration to deploy
8. Right-click on the device and power it on
9. Double-click on the device to open the console
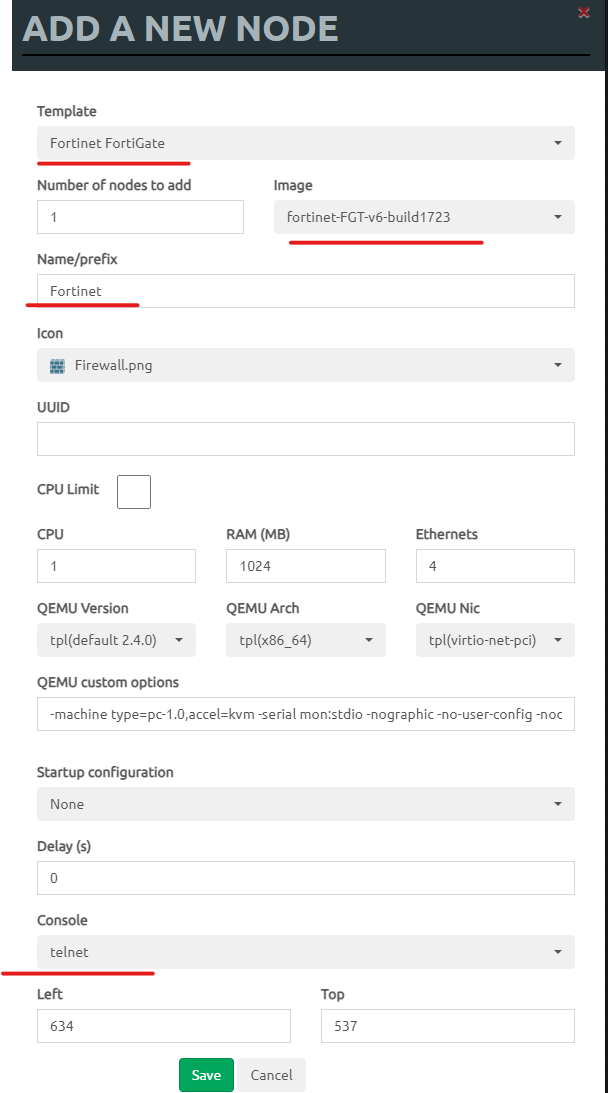
EVE-NG requires a special setup for any machine images. You use a special naming convention for the image files and SFTP them to a directory on your EVE instance. Each device is unique, so you can follow the steps for your specific image using their how-to page. You can create image files with your configs or bootstrap and virtualize a handful of CPU architectures.
EVE-NG - Thoughts
EVE-NG is king for a reason, and the evidence is reinforced every time I use it. As a product, it excels in ease of use and scaling up complex networks. Being browser-based is a great feature as you can expose the web portal to the internet and remotely access it from any machine with a web browser. As a company, they are notorious for poor customer support, out-of-touch executives, price hikes, and destructive updates, so it is not the perfect product. However, I recommend using it over any competitor in almost every situation.
Option 3 - PNETlab
PNET LAB, like EVE-NG, is a fork of UNETLAB and provides a simple way to virtualize network architectures. This was one of the more controversial options for network virtualization when it came out due to the dubious legality of their platform. Originally, you would download community-created labs from the application, and all the images and licenses used in those labs would be downloaded with the lab. They have removed that feature, but many tools still allow the same result. It is often criticized for feeling like a counterfeit EVE-NG, but people who use it often advocate that it does many things better than EVE-NG. Either way, they are both forked from the same open-source project and do not credit the original author, so interpret how you will.
PNETlab - Install
2. Download the latest OVA from [their downloads page](https://pnetlab.com/pages/download)
3. Deploy the OVA to your Hypervisor
– I am using ESXI 8.1, but the install image will work on any VMWare product
– Currently, only VMWare hypervisors are supported
– Enable CPU virtualization for the guest VM
4. Turn on the VM and console in
5. use the default login for initial setup
– root pnetlab
6. Provide your root password when prompted
7. Set the hostname and IP assignment when prompted
8. Navigate to the IP of the VM in your browser using https
9. Select ‘Online Setup’
– Online Setup ties the install to your user account and integrates with the lab store
10. Login using the splash page that appears
– If you have connection issues, ssh to the VM and troubleshoot Linux networking
PNETlab - Setup
You can import .unl lab files similar to EVE-NG, but a unique feature of PNETLAB is that you can also browse community labs from within the PNETLAB GUI. This makes installation extremely easy; it’s tied to your account, so you can find and redownload your community labs on any PNETLAB install.
Let’s start by importing a lab from the community.
1. Log into web interface for PNETLAB
– Change the dropdown from ‘Console’ to ‘HTML’
2. Click ‘Download Labs’ in the navigation header
3. Select one of the labs that appear or go to the store to browse all labs
4. In the middle of the screen, click ‘Get Lab’ to download and import it

When downloading a lab, you no longer automatically pull all of the dependencies/images used inside the lab. You will either need to swap the images in the lab for something you have downloaded or upload any required images to the server. As it’s forked from the same source project, you can use the same process described in the EVE-NG Setup.
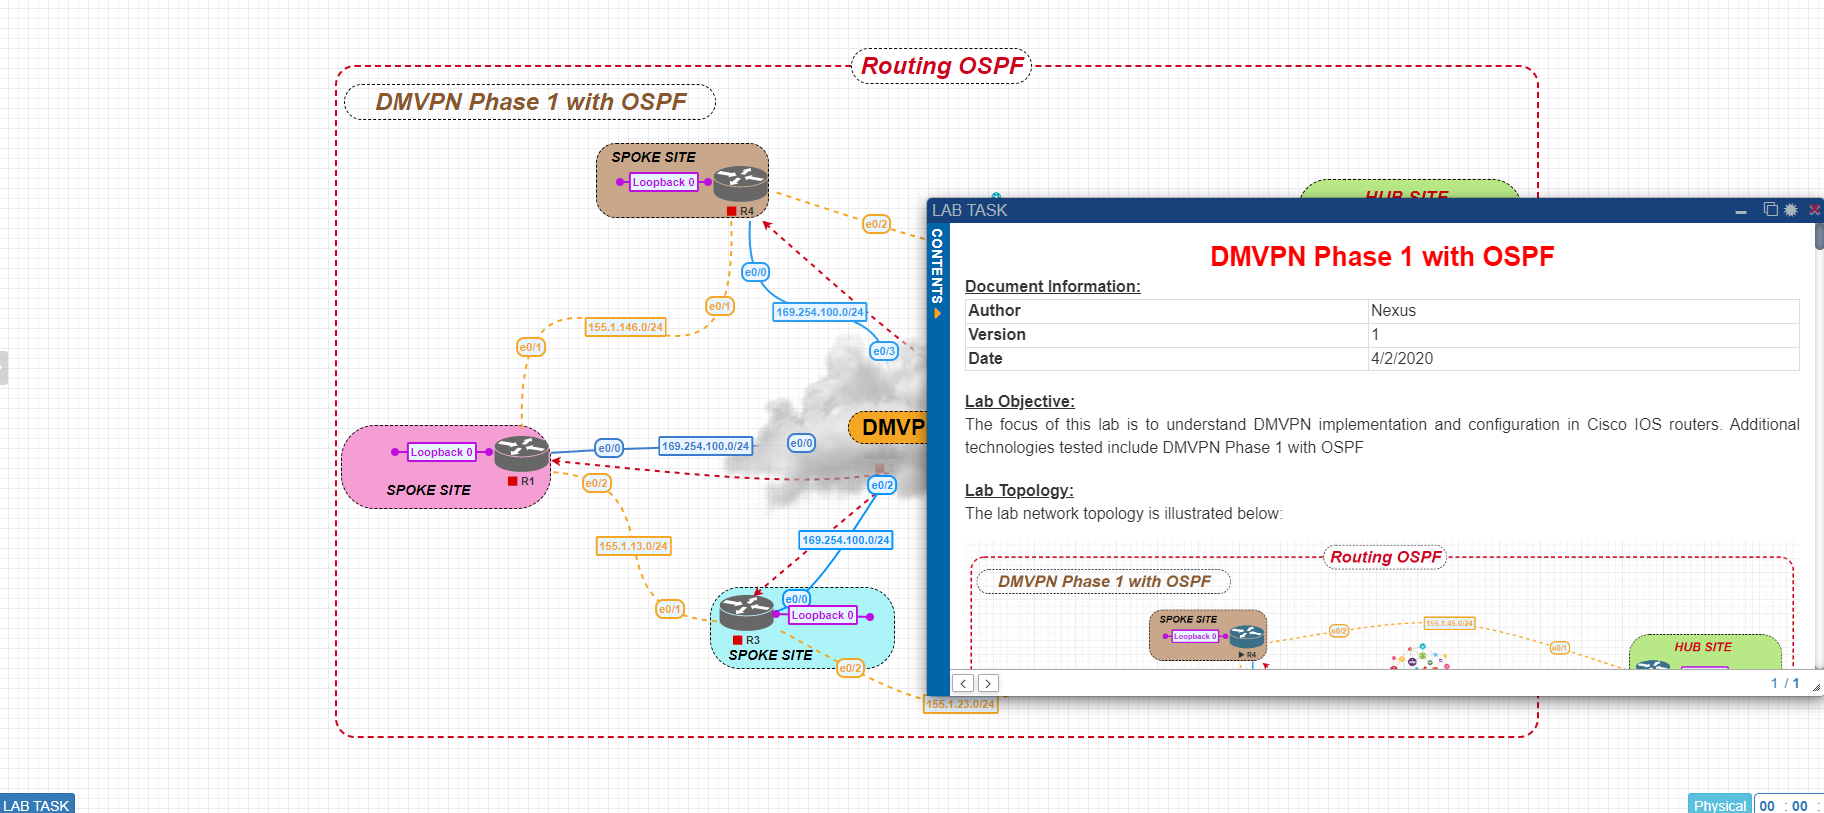
To use a downloaded lab we can open it in the GUI. Typically people will create ‘lab guides’ that you can open inside the workspace for more information.
1. Click ‘Home’ in the upper left navigation header
2. Select the lab you downloaded and click ‘open’ on the right-hand menu
3. Mouse over the far left part of the workspace and click ‘Setup Nodes’
4. Select the option to ‘Configure Nodes’
– Use the ‘Image’ column to replace or identify images to upload if needed
5. Confirm that all devices have a live image
6. Mouse over the far left and click ‘Setup Nodes’
7. Select the option to ‘Start all nodes’
PNETlab - Thoughts
It earns all of the critiques from the community about being sketchy but also lives up to its reputation of having a superior interface and experience to EVE-NG. I love the idea of downloading community labs from within the UI and the project’s open-source nature. While not as feature-rich as EVE-NG, the things that it does do it does very well, if not better than EVE-NG.
Option 4 - Cisco Packet Tracer
Cisco Packet Tracer (CPT, more commonly called Packet Tracer (PT)) is, ironically, this article’s most controversial network simulator. EVERY fledgling network engineer downloads packet tracer to start their Cisco journey. Anytime someone brings up CPT online, you will see a schism among the network engineers, and the community will collapse in on itself. It’s a classic application that Cisco put out to help students study for certifications. While extremely polarizing, the common sentiment is that CPT has everything you need to get the CCNA. Unlike other tools in this article, CPT does not virtualize anything; it simulates the behavior of Cisco hardware, but you will find that the devices are not running IOS, and most commands are not available or functional.
Packet Tracer - Install
2. Sign in or create a Cisco Network Academy account if needed
3. Download the executable
4. Open the downloaded file and sign with your NetAcad creds
Packet Tracer - Setup
The lower left panel is where you set the type of object that you want to choose from. The top row represents the main categories, and the bottom represents the subcategories. It will default to the upper left button (Networking Devices) and the lower left button (Routers). Whatever object type is filtered with these buttons will appear in the middle left panel.

1. Click and drag one of the routers into the workspace
2. Select the ‘Switches’ button on the lower row in the bottom left panel
3. Click and drag one of the switches into the workspace
4. Select the ‘Connections’ button on the upper row in the bottom left pannel
5. Click the lightning bolt and connect the router and the switch
6. Use the options dropdown in the top menu header
7. Select ‘Preferences’ and enable ‘always show port labels …’
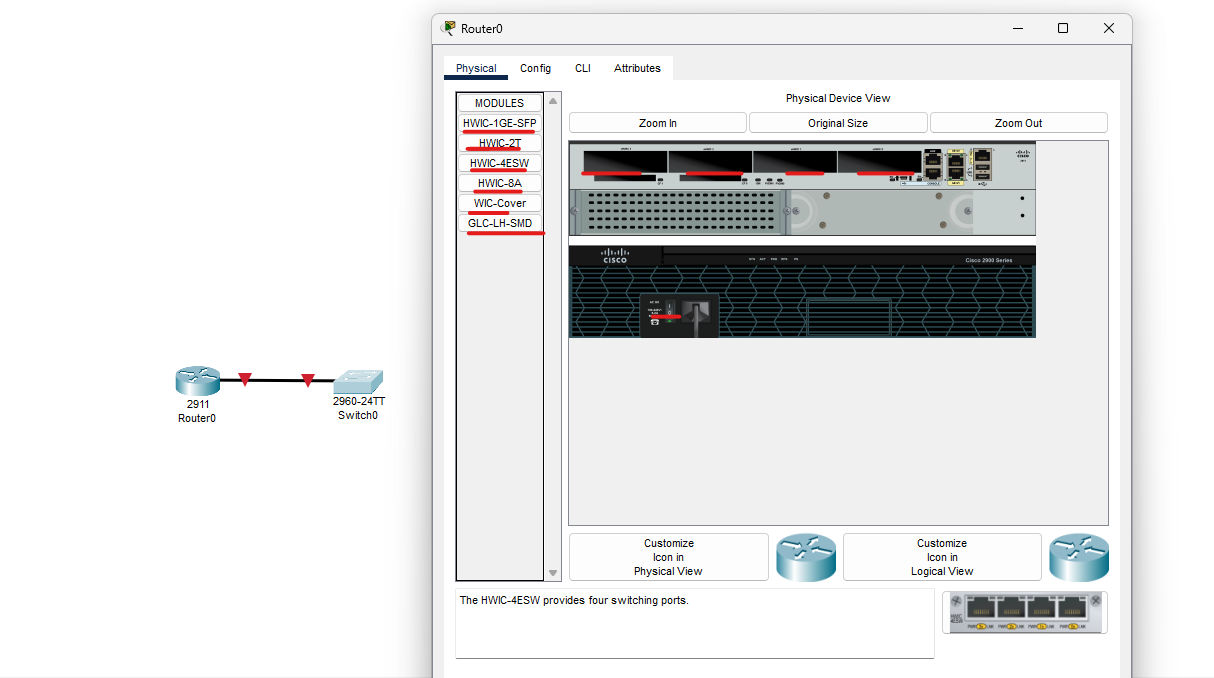
The coolest thing about packet tracer is seeing the network hardware and swapping out the available modules/expansion cards.
1. Double click on the router
2. Power down the device by clicking on the power switch
3. Click and drag any expansion card into one of the open slots
4. Power up the device by clicking on the power switch
5. Click on the CLI button
6. Decline the initial setup wizard
7. Configure the router as needed
Packet Tracer - Thoughts
While packet tracer is good enough for the CCNA, you have either outgrown it or are about to. It’s an excellent tool for starting out and is almost a rite of passage, but it is not viable for professional use.
